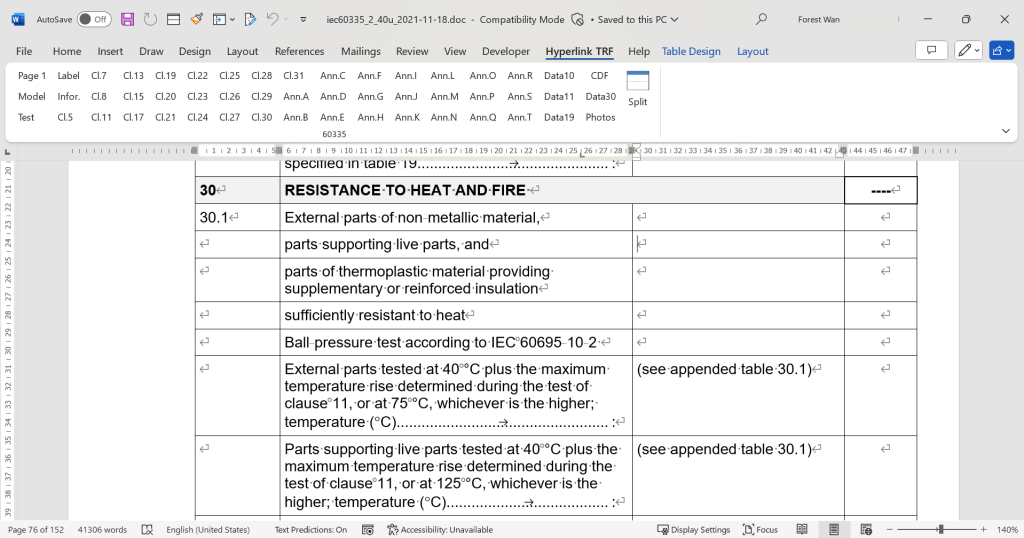
A tools for fill TRF – Hyperlink TRF
If you need to fill out a TRF (test report form) of the IEC 60335 series standard, I guess you will definitely feel that the TRF has too many pages. How to quickly locate the cursor to a certain position in the report? You may use the find function (ctrl+F), or use the mouse wheel, or use the page keys on the keyboard, which are not very convenient. If you use VBA to write a macro code, write the positioning function into the macro code, and run the macro code, you can quickly locate certain frequently required locations in the TRF.
Here, I have written a macro code that you can download directly to your personal computer. You can download it from here. Don’t forget to unzip the file.
In order to use these macros when filling out the Word format TRF, you need to make the following settings: File-Option-Trust Center-Trust Center Settings-Macro Settings-Enable all macros (not recommended; potentially dangerous code can run) or Disable all macros except digitally signed macros. Then, you need to restart the Word program.
Before using the macro, you need to import the macro what you just downloaded into Word. I recommend the following method.
Place the mouse on the Word toolbar, right-click, select “Customize the robbin”, select “Customize Ribbon” on the left side of the pop-up dialog box, and check “Developer” in the right window. Close the window. At this time, the Developer toolbar will appear in your Word toolbar.
Before using the macro, you need to import the macro you just downloaded into Word. I recommend the following method.
Place the mouse on the Word toolbar, right-click, select Customize the robbin, select Customize Ribbon on the left side of the pop-up dialog box, and check Developer in the right window. Close the window. At this time, the Developer toolbar will appear in your Word toolbar.
Select the Developer toolbar, click Visual Basic button on the left, select Normal on the left side of the pop-up dialog box, right-click, click Import File, select the downloaded macro file in the pop-up dialog box, and click OK to import. At this time, the macro has been imported into your personal computer.
When you run macros via View-Macros-select a macro base on Macro name on left window-run, it is cumbersome, and the best way to do it is to place these macro functions on the toolbar. The result after importing is shown below:

In order to place macro functions in the toolbar, you need to customize the toolbar. Place the mouse on the toolbar, right-click, select “Customize the robbin”, select “Customize Ribbon” on the left, and select “Macros” in the drop-down menu “Choose commands from:”. You can now see all the macros listed in the display box below. Click the “New Tab” button in the dialog box on the right, and you will see a label “New Tab (Custom)” added to the upper content box. You can click the Rename button to change the name, and then click the Add button between the two content boxes to add the macros in the left content box to the right content box. Add the macros you need. After completion, you can sort and change the name of each macro (you can also change the icon style). Click the OK button. Congratulations, you have successfully added the macro to the Word toolbar. After that, all the Word documents you open can use the macro function in the toolbar.
Try these macros to see if they can help you quickly navigate to certain locations in your report.