Clause 3 – How to understand the definition of “creepage distance”
creepage distance: shortest distance along the surface of insulation between two conductive parts or between a conductive part and the accessible surface.
Charges can be propagated in a directional manner through the air, thus forming an current. This is the meaning of clearance. Charges can actually also propagate through the insulating material itself, because no material is completely insulated. The difference in the current formed between the two electrodes when two electrodes with different potentials are applied to the two sides of ordinary A4 printing paper and to the two sides of 2mm thick tread rubber material is very large. Charges can also be propagated in a directional manner along the surface of the insulating material. The effect of charge propagation on the surface of different materials is also different. If other substances (pollutants) are attached to the surface of the insulating material, the effect of charge propagation is also different. In order to prevent charges from propagating along the surface of the insulating material and causing electric shock, the definition and requirements of creepage distance are generated. Charge propagation through the insulating material body generates the solid insulation requirements mentioned in the first paragraph of clause 29. Clause 29.2 gives the requirements for creepage distance.
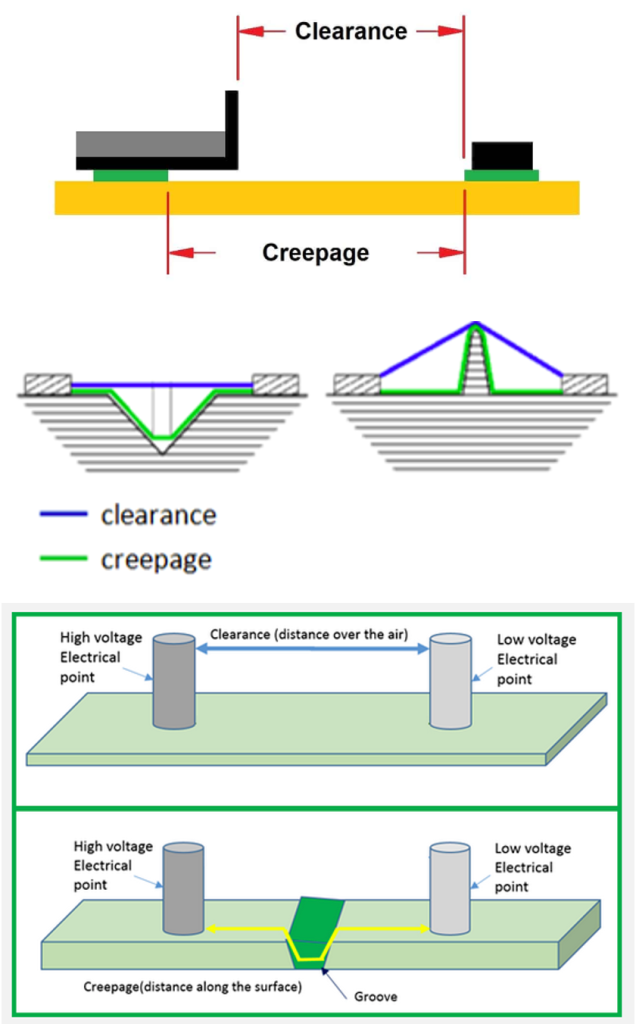
The definition of creepage distance comes from the IEC 60664-1:2020 standard. Since we need to explain creepage distance, we must show the pictures of figure 4 to figure 14 in the IEC 60664-1:2020 standard. Here, readers need to carefully consider how to determine “X mm”. If there is a groove on the path formed the creepage distance, there will be a bridge groove situation. I personally think that the main reason for bridging is the deposition of pollutants in the groove. These pollutants are mainly dust, and moist dust is more conductive. Therefore, copying the original text of the standard, there are the following three assumptions:
– Where the distance across a groove is less than the specified width X (see Table 1), the creepage distance is measured directly across the groove and do not take into account the contour of the groove (see Figure 4).
– where the distance across a groove is equal to or larger than the specified width X (see Table 1), the creepage distance is measured along the contours of the groove (see Figure 5);
– any recess is assumed to be bridged with an insulating link having a length equal to the specified width X and being placed in the most unfavourable position (see Figure 6);
– clearances and creepage distances measured between parts which can assume different positions in relation to each other, are measured when these parts are in their most unfavourable position.
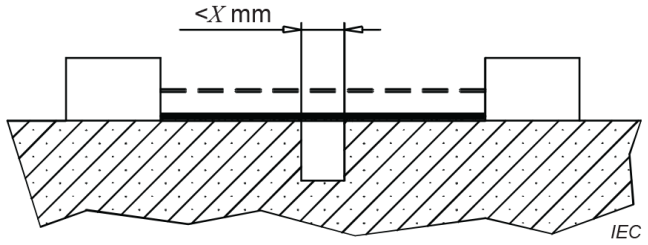
Condition: Path under consideration includes a parallel- or converging-sided groove of any depth with a width less than X mm.
Rule: Clearance and creepage distance are measured directly across the groove as shown.

Clearance

Creepage distance
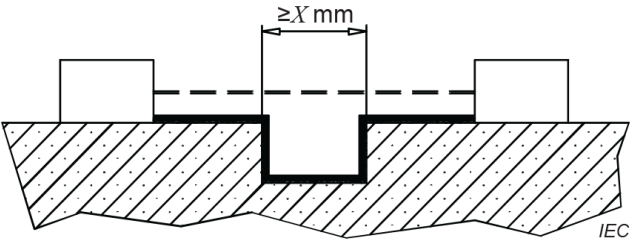
Condition: Path under consideration includes a parallel-sided groove of any depth and equal to or more than X mm.
Rule: Clearance is the “line of sight” distance. Creepage path follows the contour of the groove.

Clearance

Creepage distance
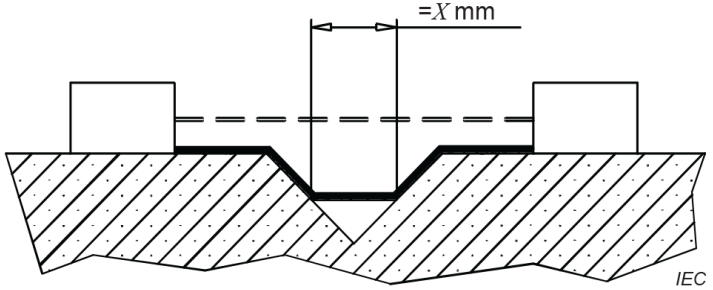
Condition: Path under consideration includes a V-shaped groove with a width greater than X mm.
Rule: Clearance is the “line of sight” distance. Creepage path follows the contour of the groove but covers the bottom of the groove by an X mm insulating link.

Clearance

Creepage distance
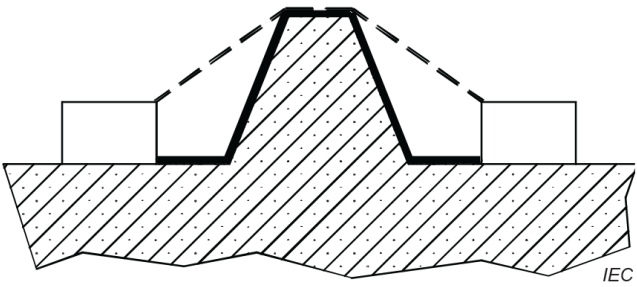
Condition: Path under consideration includes a rib.
Rule: Clearance is the shortest direct air path over the top of the rib. Creepage path follows the contour of the rib.

Clearance

Creepage distance
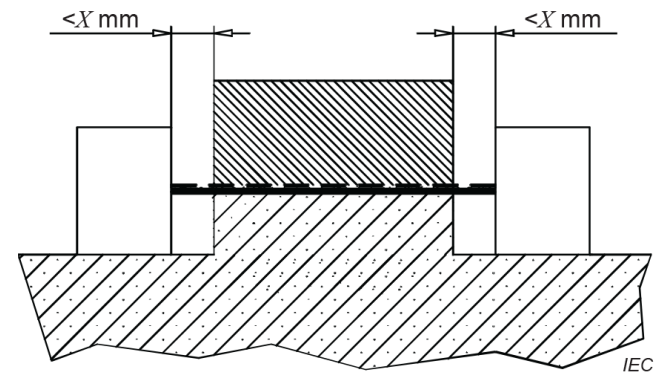
Condition: Path under consideration includes an uncemented joint with grooves less than X mm wide on each side.
Rule: Clearance and creepage path is the “line of sight” distance shown.

Clearance

Creepage distance
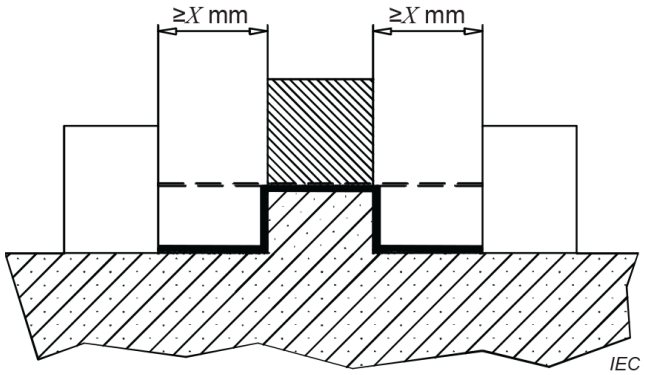
Condition: Path under consideration includes an uncemented joint with grooves equal to or more than X mm wide on each side.
Rule: Clearance is the “line of sight” distance. Creepage path follows the contour of the grooves.

Clearance

Creepage distance
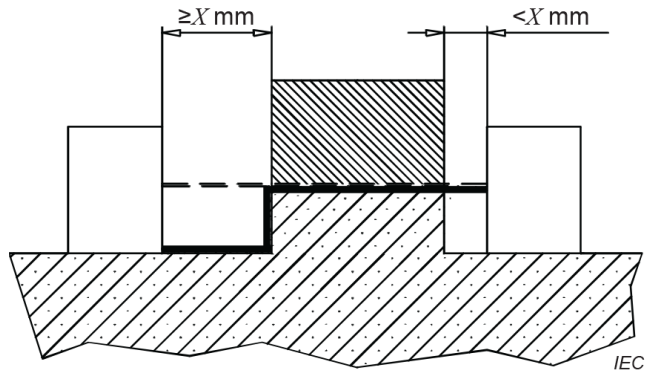
Condition: Path under consideration includes an uncemented joint with a groove on one side less than X mm wide and the groove on the other side equal to or more than X mm wide.
Rule: Clearance and creepage paths area as shown.

Clearance

Creepage distance
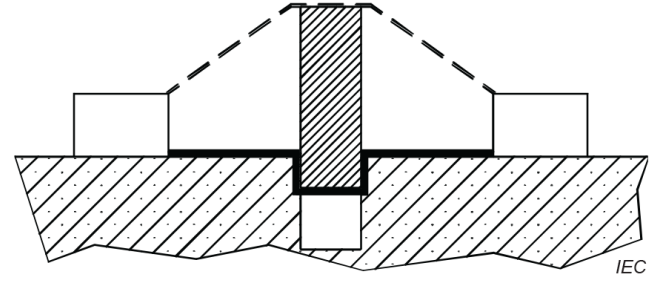
Condition: Creepage distance through the uncemented joint is less than the creepage distance over the
barrier but more than the clearance over the top of the barrier.
Rule: Clearance is the shortest direct air path over the top of the barrier.

Clearance

Creepage distance
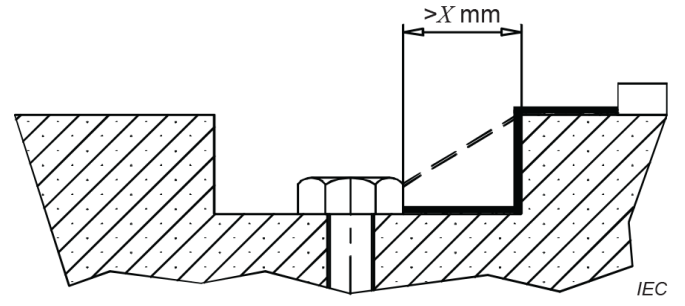
Gap between head of screw and wall of recess wide enough to be taken into account.

Clearance

Creepage distance
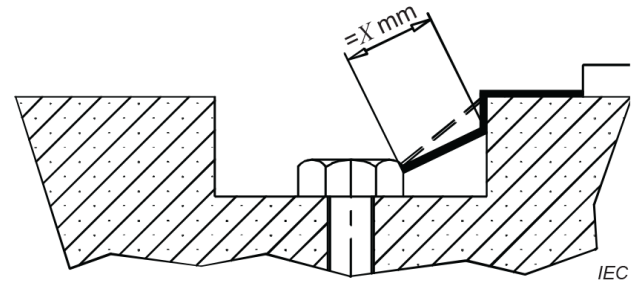
Gap between head of screw and wall of recess too narrow to be taken into account.
Measurement of creepage distance is from head of screw to wall when the distance is equal to X mm.

Clearance

Creepage distance
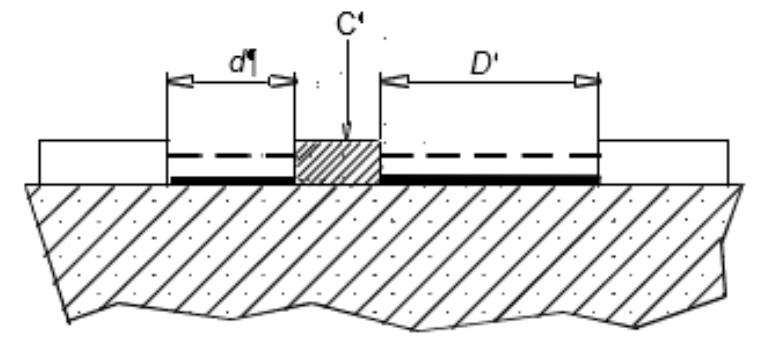
C: conductive floating part
Clearance is the distance = d + D
Creepage distance is also = d + D
NOTE See Table F.2 for the minimum clearance of d of D.

Clearance

Creepage distance
The dimension X, specified in the following examples, has a minimum value depending on the Pollution degree as follows:
| Pollution degree | Dimension X minimum value |
| 1 | 0,25 mm |
| 2 | 1,0 mm |
| 3 | 1,5 mm |
If the associated clearance requirement is less than 3 mm, the minimum dimension X may be reduced to one-third of the associated clearance.
Let’s take an example to illustrate how to calculate the value of “X mm”. If you measure a path of 5 mm and find a groove in the path, assuming pollution degree 3, based on above table, then X = 1,5 mm (taking the pollution degree into account). If the distance you measure is 2,7 mm, then X = 2,7 mm/3 = 0,9 mm.
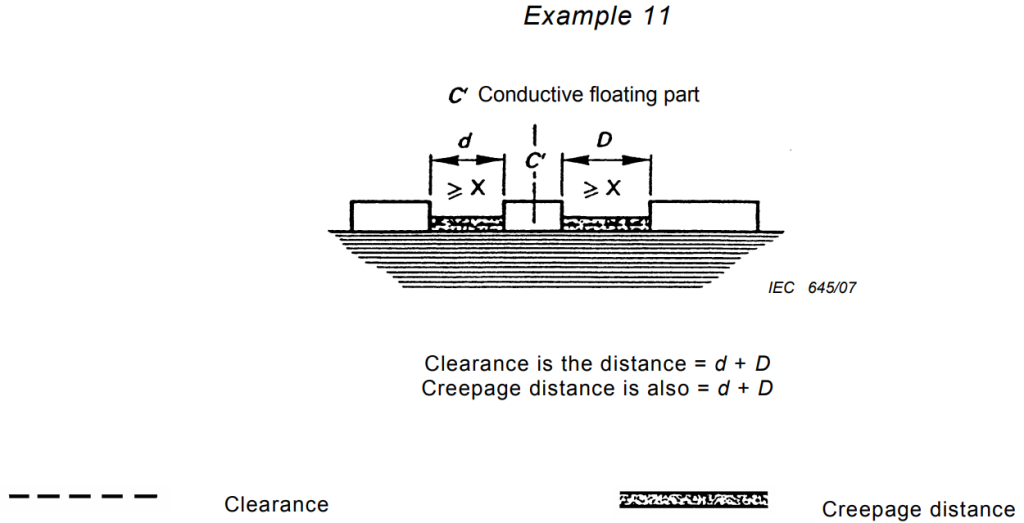
Let’s explain example 11 separately. The above picture comes from the IEC 60664-1:2007 version. If readers check the picture carefully, they will find that only when d>X, clearance is the distance = d + D is true, otherwise, clearance is D. The calculation rules of D and d are the same. However, we need to point out that, in fact, this is an error, and the standard gives an incorrect requirement. The IEC 60664-1:2020 version of the standard has corrected this error, and decision CTL DSH 2160 2020 2020-01-22 have clarified this issue.
The rules for creepage distance are much more complicated than those for clearance, and the requirements in clause 29 are also more complicated. Regarding creepage distance, I think if readers can understand the above information, it is sufficient for implementing the IEC 60335 series of standards. The requirements for creepage distance in clause 29.2 will be introduced in detail when introducing clause 29.2.
On the other hand, if you want to have a deeper understanding of the concept of creepage distance, you must read the decision “CTL DSH N. 0717 2008 October 22”, because all PT for creepage distance measurement will refer to this decision.